Thanks to everyone who came to the New Hampshire event and a special thanks to White House Custom Colour and Hunt’s Camera Store for the sponsorship and support. I had previously posted about the event and included images I did of Molly. This is part 2 showing more images I created that day of the other models.
While teaching, I demonstrated some various techniques on making women look great in photographs.

These images don’t have any finishing touches on them yet, and that’s because I was showing that they should look great right out of the camera. Any final enhancements later should only be slight as the images should be ready to print without them if you did everything correctly.
All of these images have no retouching, no skin softening, and no effects added. All I did was sort them in front of the group using Lightroom which we used to pick our favorites, then I vignetted some edges and converted other images to b&w. That’s it!
The idea is that we should create amazing images right in the camera that are exposed perfectly, color balance perfectly, and otherwise look ready to print, without having to work on them later. Any work we do later will be slight and will be things we can’t do in the camera. All of our lighting and posing should be deliberate and should help the model look amazing and should not be haphazard.


Some people think that great images come from having a good camera. That’s like saying good songs are only written on good guitars when the truth is it’s the artist using the camera or guitar. Any good musician can write a great song on any guitar, and any great photographer can create great images on any camera.
Another misnomer is that that great images come from having beautiful models. This is also incorrect. A great photographer understands exactly how to make everyone look better and an average photographer will make even the prettiest person look worse.
I love teaching workshops because I really like helping photographers do better, plus it helps to raise the level of quality in the industry.
In New Hampshire, I was teaching how to create great images with any camera, and how to make all women look better using specific lighting and posing.
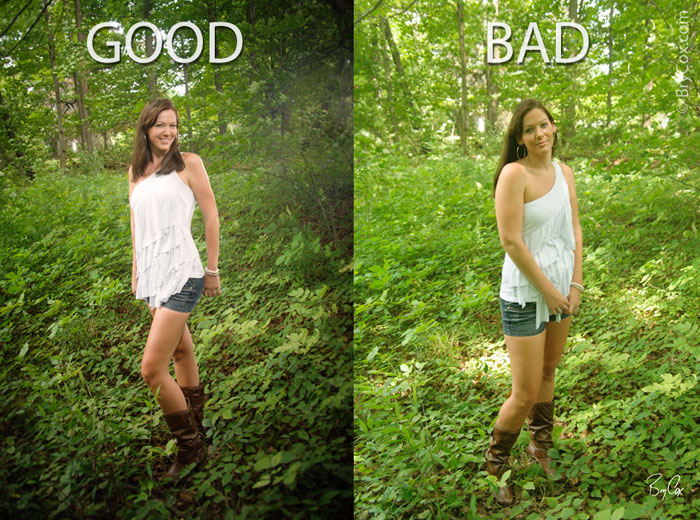
Here are two portraits of the same pretty girl in the same beautiful location. I shot her two different ways to show that a camera in the right hands will make her look better, and in the wrong hands she will look worse. Look at the two images and see if you can see all the differences.
In the first image, I used custom lighting and posed her specifically in a way that would be more flattering for her and her outfit. I took control of all aspects of the exposure which means her skin tones have great color right out of the camera. I separated her from the background and sculpted her using directional light at particular angles. Everything was set up and shot manually, nothing left to chance or to Auto functions.
Then I did another image of her the way most photographers would, with no specific poses, no control of light, and shooting the camera on Auto.
Notice how flat this second image looks. Her skin tones are green, the light on her face is coming from the sky rather than from any controllable or directional source, her eyes are dark, the background is too light, and the wrong camera angle and lack of posing and lighting make her look thicker. Again, NO woman wants to look thicker or heavier, and fixing it later on the computer isn’t the same as shooting it right.
This is why most photographers shoot so many images – they hope that with the law of averages they’ll get something decent that they can then spend tons of time on the computer fixing and covering with various effects.

So with a change of clothes, I continued to teach and shoot this model, walking around the town, making sure that each pose and lighting set up made her look great.

(Image above converted to b&w and toned in Lightroom. No other work or retouching was done to this image.)

We ended up at this cool bridge which gave me some cool leading lines.
Well, if you’d like to attend a Bry Cox workshop, check my schedule here. I also have many tutorials in the Member’s Only section of this site that you can use to give you a head start before you attend and as refresher info after you attend.