For few years I’ve been demonstrating how to use a flash on a monopod for custom lighting in a mobile package. I can easily move the light to where I need it, and even use multiple flashes (speed-lights) using small light stands. Aside from my teaching this at workshops, this has really caught on due to a YouTube video created by PocketWizard where you can see me actually using this technique. You can also see me using this in conjunction with lights on stands in my entire Light Like a Master course here on my site.
It’s easy to create a setup like this, but only if you know what parts to get and where to find them all. This article should help you with what parts to get, where to find them, and how to set it all up.
[ UPDATE: Instead of purchasing the radios and flashes separate, I’ve now been buying this Phottix Mitros+ kit. See this video about it. ]
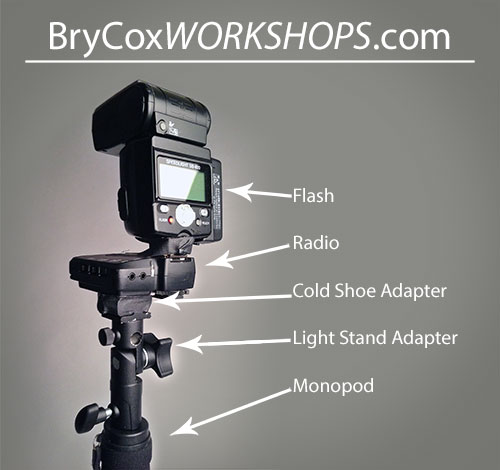
What you’ll need:
- Flash
- Radios
- Lightstand to flash adapter
- Cold Shoe Adapter (Manfrotto part 262)
- Monopod
- Light stand
- Gaffer Tape
1 – Flash
You probably already have some speedlights for your Nikon or Canon camera. But before you buy more, you can now get Phottix Mitros+ speedlights specifically for your Nikon or Canon cameras.
If you shoot a camera of a different brand, you can still rig something, but you may not have TTL/eTTL capabilities. Nevertheless, there are new radios coming out each year. But running some basic radios that do manual only is not bad. Keep in mind that I use manual 95% of the time. I only use eTTL to over power the sun on bright sunny days. The rest is completely manual.
And if you’re using a Hasselblad, Mamiya, Leica, or some other camera with a leaf shutter, you can use any flash without worry of sync speed so manual radios will do fine.
2 – Radios
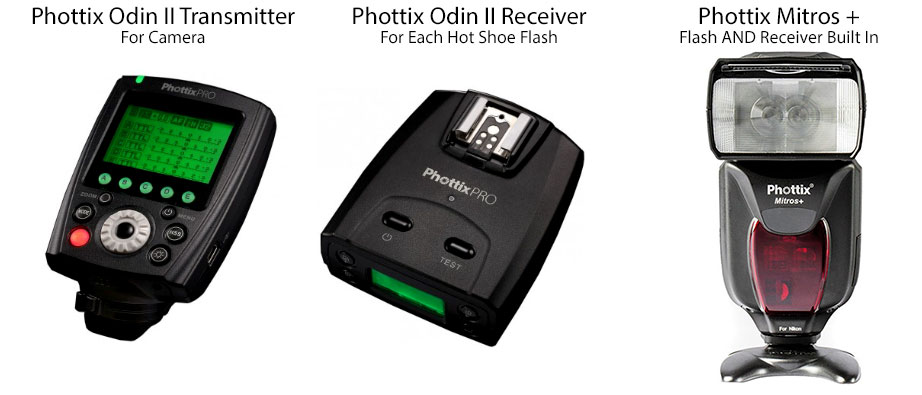
[Update] Since I originally wrote this article, I’ve updated the radios that I use. I now use the Phottix Odin II transmitter and receivers. They seem to work better with less misfires, and the transmitter on the camera gives me more control over the flashes in the field.
You’d need one transmitter for your camera and one receiver for each speedlight hot shoe flash you own and want to connect. BUT, if you don’t own hot shoe speedlights or want to buy another, it’s a better value to get the Phottix Mitros+ which is a speedlight flash and receiver built in.
When you see the light stick all built in this article though, you’re seeing the older radios I used to use, the PocketWizard Mini and Flex radios. Both the PocketWizard radios and my newer Phottix radios are brand-specific. So if you’re shooting Nikon, you need the Phottix Nikon radios, and if you’re shooting Canon, you need the Phottix Canon radios. And Phottix offers Sony radios too if you shoot Sony.
Though I shoot almost everything with manual flash, there are times when I may want TTL/eTTL to kill the sun and my exposure is outside my camera’s sync speed. These newer types of radios do TTL well, and your camera thinks the flash is actually hooked up to the camera directly. That’s why you need camera-brand specific radios because these units are programmed differently for each brand.
So if you shoot something other than Nikon, Canon, or Sony, you can get the Phottix Ares II radios, but they will be manual only. I have an Ares in my bag just in case. I figure if all my Nikon bodies go down, I can put it on something or anything else (like my Panasonic Lumix manual point and shoot) and still run my flashes.
Also note that Canon shooters were having problems with the PocketWizard radios for some reason. But I haven’t heard any complaints about these newer Phottix radios from anyone shooting any brand of gear.
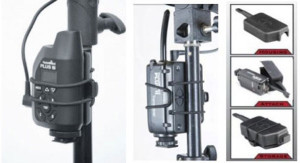
Manual Only Radios
If you already have some older manual-only radios, you can use them too. Because I tend to shoot manual anyway, you could try using what you’ve got already. But you do need some kind of caddy or rig to attach the radio to your pole and then a sync cord to run from your radio to your flash (unless it has a hot shoe connection). Sync cords seem to cause trouble. It always seems that they are either going out, have a bad connection or a short, or just work intermittently. No connection is perfect, but I like the hot shoe connection better.
I’d avoid the Radio Popper brand. They require that you use an additional flash on your camera to “control” the flash you have on your pole. That’s a $300-$400 flash that’s not being used for lighting, and a complete waste of a flash and money. If I have an extra flash, (which I do), then it’s going to be in the field as a second flash used for rim light or doubling up as a second main flash.
So these newer radios like Phottix allow me to run as many flashes as I own – no need for the useless “commander” flash on your camera.
3 – Lightstand to Flash Adapter
Monopods were not made for small speedlights, so you’ll need a little adapter to attach this rig. I really like this one linked below. I have a few of them, one for each flash plus some backup ones.
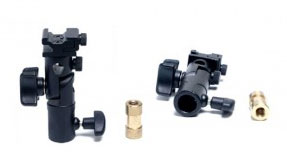
This comes with the brass attachment for a monopod that turns it into a lightstand top, and it also includes the black bracket for connecting your flash to any brass lightstand top. It accepts umbrellas as well, so you an be creative in how you use your flash stick.
https://mpex.com/lumopro-lp633-compact-umbrella-swivel-w-variable-cold-shoe.html
4 – Cold Shoe (Manfroto part #262)
If you have the Phottix radios, you won’t need this cold shoe part.
But if you’re using the PocketWizard radios, they have a flimsy plastic hot shoe which breaks easily. I know. I’ve broken them a few times. So to protect it, I adapted them with a metal “cold shoe.” Cold means there’s no electric connection, it’s just a hardware connection. It’s only a few bucks, and it screws it into the bottom of your PocketWizard. There you can attach your bracket to it instead. It’ll be much more stable and will save you some repairs.
Also, a sandbag full of lead is always a great idea. I use them on location on my light stand legs to help keep my light stable and to prevent it from tipping over and breaking.
5 – Monopod
Any monopod will do, but usually I’m holding the light stick with one hand and my camera with another. For that reason I want the lightest monopod I can get. As much as I hate buying any kind of gear at WalMart, I did find a $9 monopod there which has become my favorite monopod for this one purpose.
I would never trust a camera on this, but for as a light stick, it is perfect. It is lightweight and small, and with some gaffer tape you can change the way it feels in your hands.
6 – Light Stand
I often use only light stands, rather than holding the light myself. So if you won’t want to hold your own light, or if you want to run a few flashes, some will need to be on stands.
My favorite stand for this is the auto-collapse type stand made and sold by Denny backgrounds. When you pick it up, the legs collapse, and when you set it down again, they pop out. It works really good and is perfect for moving around quickly.
Denny’s has two versions of the stand, and the lighter version is perfect for a small flash setup like this.
http://www.dennymfg.com/ProductDetailsNew1.aspx?PId=987544e6-4f8a-42df-a24d-052f620a2b4e&PTId=a49b9a28-32db-4529-b199-81bcb86d2c04
7 – Gaffer Tape
I dont’ trust any of the connections holding these flashes and parts together. I like taping them to know they’re secure. And for tape, I prefer gaffer tape.
Unlike duct tape or other options, gaffer tape is made to be removed. It’s made for photographers and won’t leave a gummy mess on your gear and is a must for any rigging job, such as this.
Plus it is great for covering logos or for adding grip to slippery gear. I usually apply some to all my stands, and even add a little extra where I won’t be holding it, for tape storage, so I can quickly get some when I’m in the field and need some to secure something.
I really like these small rolls for keeping in my camera bag.
http://www.pictureline.com/superior-gaffer-grey-permacel-2-x60yd.html

Shooting Manual vs. eTTL
I shoot almost everything with manual flash and manual camera settings. The only exception is when I need to overpower the sun and then I’ll switch my flash to TTL/eTTL, and leave everything else in manual mode.
Use this flash technique in combination with the info in these two articles.
– 3 Steps to a Perfect Exposure & White Balance
– 3 Step Process to Lighting Women for Zero Retouching
Good luck and Happy Shooting!